How To: Take Window Screenshots Without Drop Shadows on Your Mac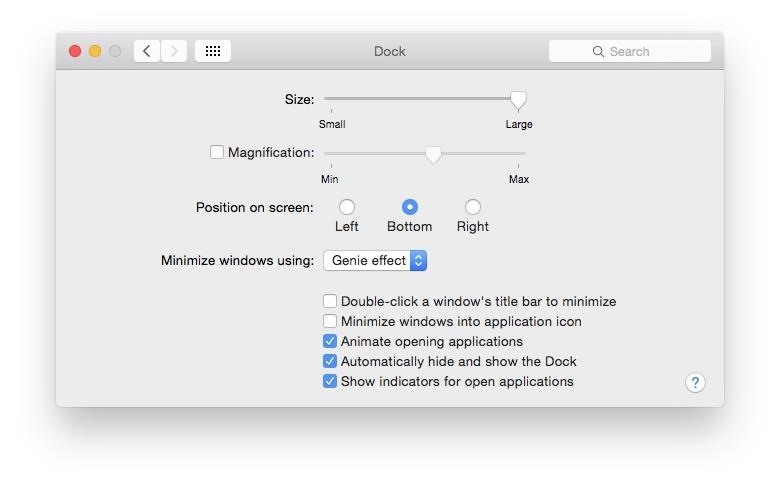
There are many ways to take a screenshot in macOS (previously Mac OS X), but all of the well-known options give you a drop shadow in the picture when snapping application windows.If you use the Command Shift 3 shortcut, it takes a screenshot of the entire screen. If you use Command Shift 4, it lets you select a portion of the screen. If you use Command Shift 4, followed by Spacebar, you get an option to take a screenshot of a specific window. If you use Command Shift 5 on Mojave and higher, you're using Apple's newer "Screenshot" app which gives you easier access to all of the above.That options to take app window screenshots are really useful, as they let you select a full window without your desktop or any additional app windows behind it cluttering things up — but it still adds a drop shadow to the selected window, as seen below. Using the shortcut Command Shift 3, followed by Spacebar, and clicking. Because of the drop shadow, there's a lot of empty space around the image that you may not want, especially if you're uploading the image onto certain websites. For instance, the empty space turns white in this article, as clearly seen above. Even if you were to take the screenshot using Preview instead, the drop shadow would still be there.But there are many ways to solve this issue, from the super simple to the more complex to the most convenient.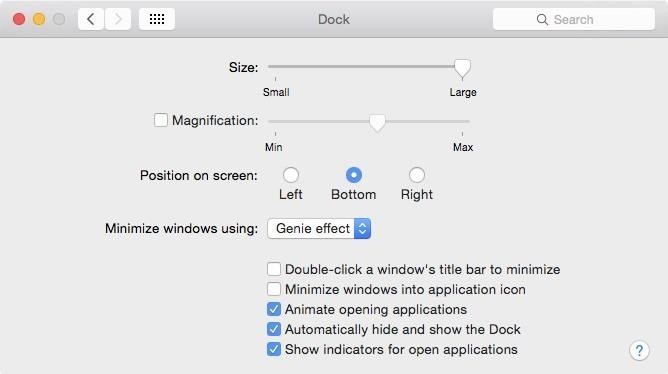
Method #1: Use the Option Key for Shadowless WindowsIt's a little-known trick since it's not mentioned anywhere in macOS, but it's the simplest one out of all the ones I will be mentioning here. Just use the Option key when taking a screenshot of a window.To make that clearer, hit Command Shift 4 to activate the crosshairs selection icon, then Spacebar to activate the camera icon. Then, while you click on the window of your choice, hold down the Option key. Alternatively, you can hit Command Shift 5 on Mojave and higher, select the "Capture Selected Window" option from the menu, then Option-click on the window. Using the shortcut Command Shift 4, followed by Spacebar, and Option-clicking. If you don't like using this easy-to-forget keyboard combo every time you want to get rid of the drop shadows for window screenshots, then try out the following option.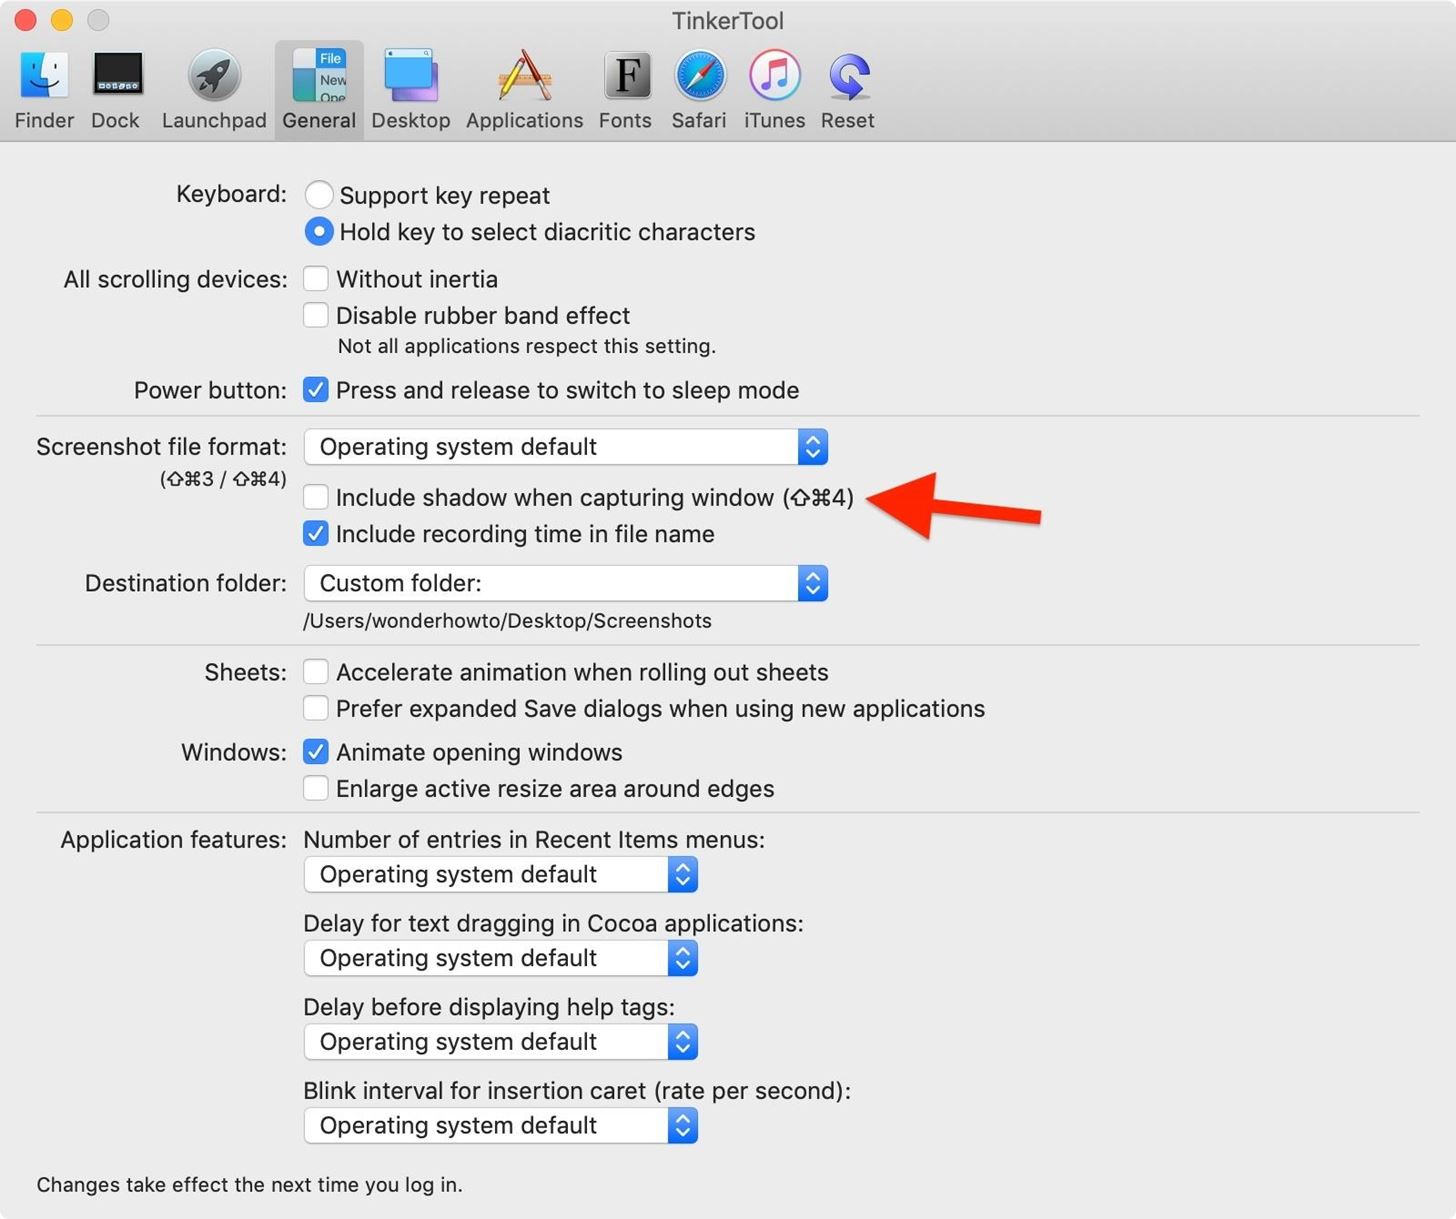
Method #2: Use TinkerTool to Toggle Shadows On/OffBy using a third-party app called TinkerTool, it's easy to disable drop shadows for the standard Command Shift 4 / Spacebar screenshot. Head to the "General" tab in the app, and uncheck the box next to "Include shadow when capturing window." Your choice won't be activated until you reset your Mac's menu bar services, which you can do by either logging out and logging back into your user profile or using the following Terminal command. killall SystemUIServer Now whenever you use the Command Shift 4 / Spacebar shortcut, drop shadows will be gone — no Option needed. To bring drop shadows back, just check the option in TinkerTool and reset your menu bar services using one of the two options above.If you want to see more of what this app can do for your Mac, check out our TinkerTool guide, which goes into depth about each section and what kind of tweaks are available.
Method #3: Use Terminal to Toggle Shadows On/OffIf you're familiar with Terminal, you may just want to use it over TinkerTool to toggle drop shadows on and off. To do so, just input the following command. defaults write com.apple.screencapture disable-shadow -bool true Just like with TinkerTool, you will need to either log out and back in or use the following command to refresh the menu bar services. killall SystemUIServer Drop shadows should now be disabled when using the default Command Shift 4 / Spacebar routine without Option. If you ever want to bring them back, just use the following command in Terminal, again, followed by the SystemUIServer killall command. defaults write com.apple.screencapture disable-shadow -bool false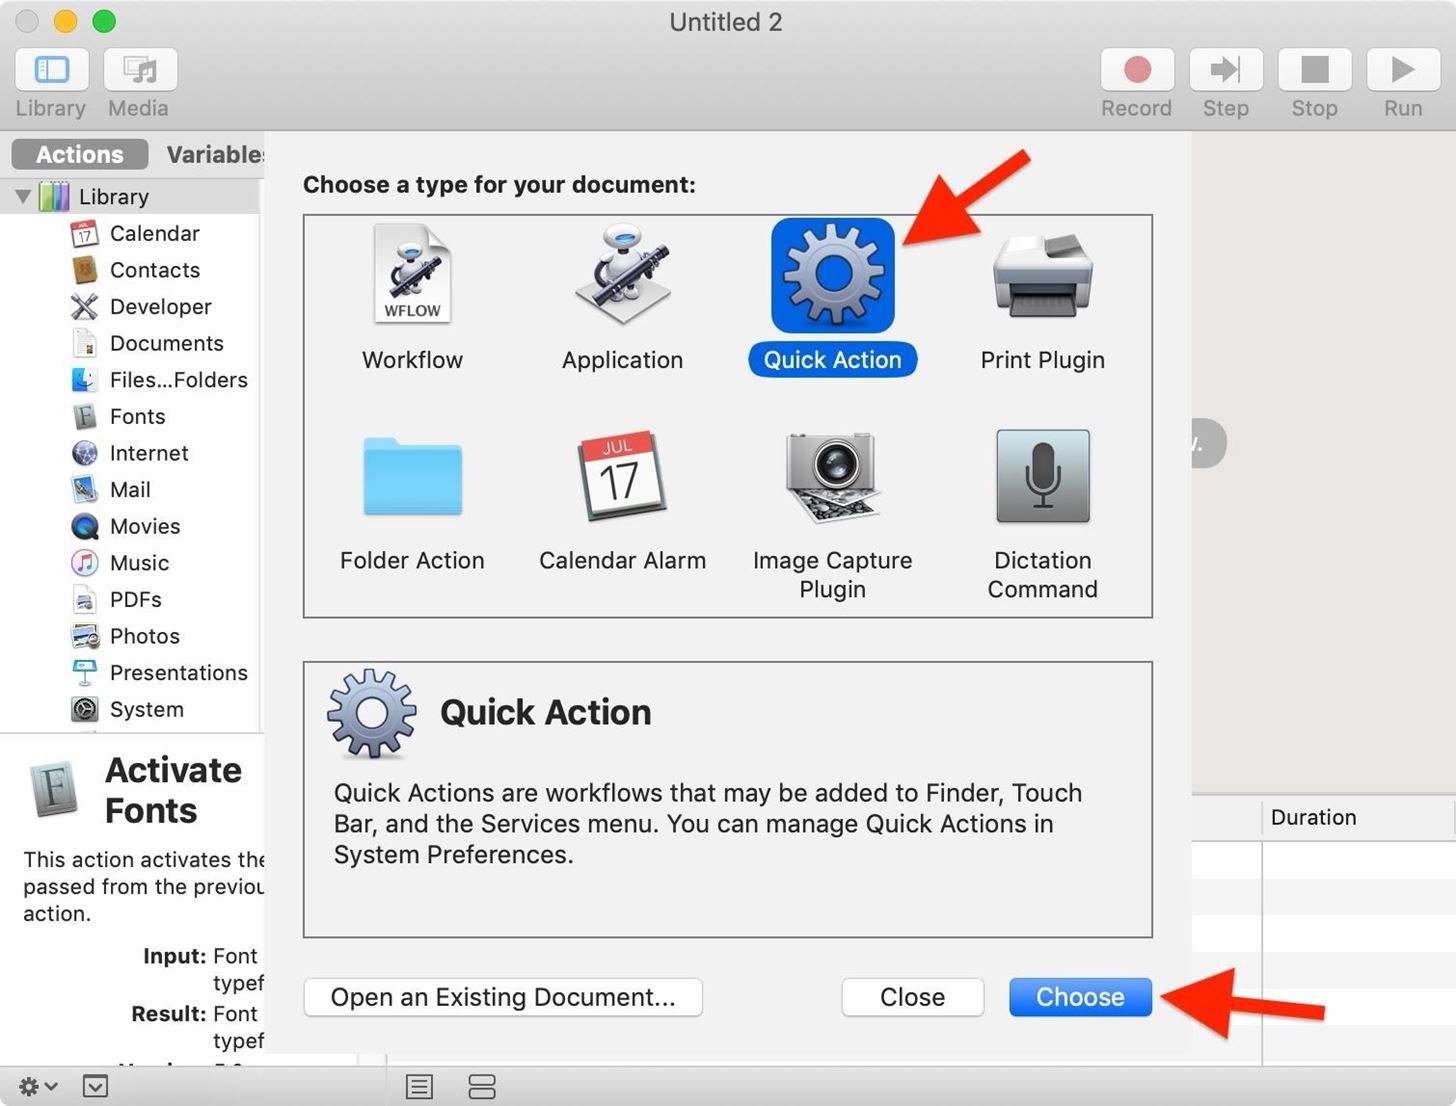
Method #4: Make Your Own Window Capture ShortcutThe hidden keyboard shortcut may be a pain in the ass, and the TinkerTool option requires a logout/login in order to take effect each time you want to enable/disable the drop shadow. Also, Terminal commands seem like overkill when it comes to screenshots. So what's the next best thing? Creating a Window Capture service.If you've used Automator before in the past, this should be a breeze. If not, it's still fairly simple and is a good starting lesson for getting to know Automator and what it can do for your Mac.Open up Automator on your Mac (it should be in Applications). Select "Quick Action" (or "Service") from the popup window, then "Choose." Change Workflow receives selected (or Service receives selected) from "text" to "no input." Select "Utilities" from the left actions menu. Drag "Run Shell Script" over to the blank area. Delete anything that's in the Run Shell Script box, then paste the following code into it. timestamp=$(date +"%Y-%m-%d at%l.%M.%S %p");
file="$HOME/Desktop/Screen Shot $timestamp.png";
screencapture -ow "$file" If you want to use military time (aka 24-hour time) instead, use the following. timestamp=$(date +"%Y-%m-%d at %H.%M.%S");
file="$HOME/Desktop/Screen Shot $timestamp.png";
screencapture -ow "$file" Go to File –> Save (or use the Command S shortcut). Save as "Window Capture" (or "No-Shadow Window Capture," etc.). If prompted to apply the changes, do so and it will automatically be added to your list of services. If you were not prompted to save this as a service on your system, you might have to do so manually. Just go to System Preferences –> Keyboard –> Shortcuts, then select "Services" from the left sidebar. Next, scroll down in the right column and make sure that "Window Capture" (or whatever you called it) is checked under the General section.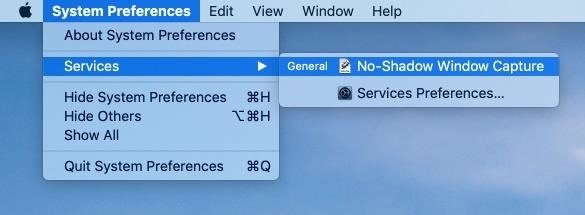
Using the Window Capture ServiceAfter applying the newly created service across your system, you should see "Window Capture" as an option whenever you select [App Name] –> Service from the menu bar. Click on the new screenshot service to initiate a window-only capture. A camera icon will pop up. Just hover to select the window that you want, then left-click to take the screenshot. It will be recorded with the same filename that standard screenshots use in macOS. The resulting image will be isolated without any drop shadow.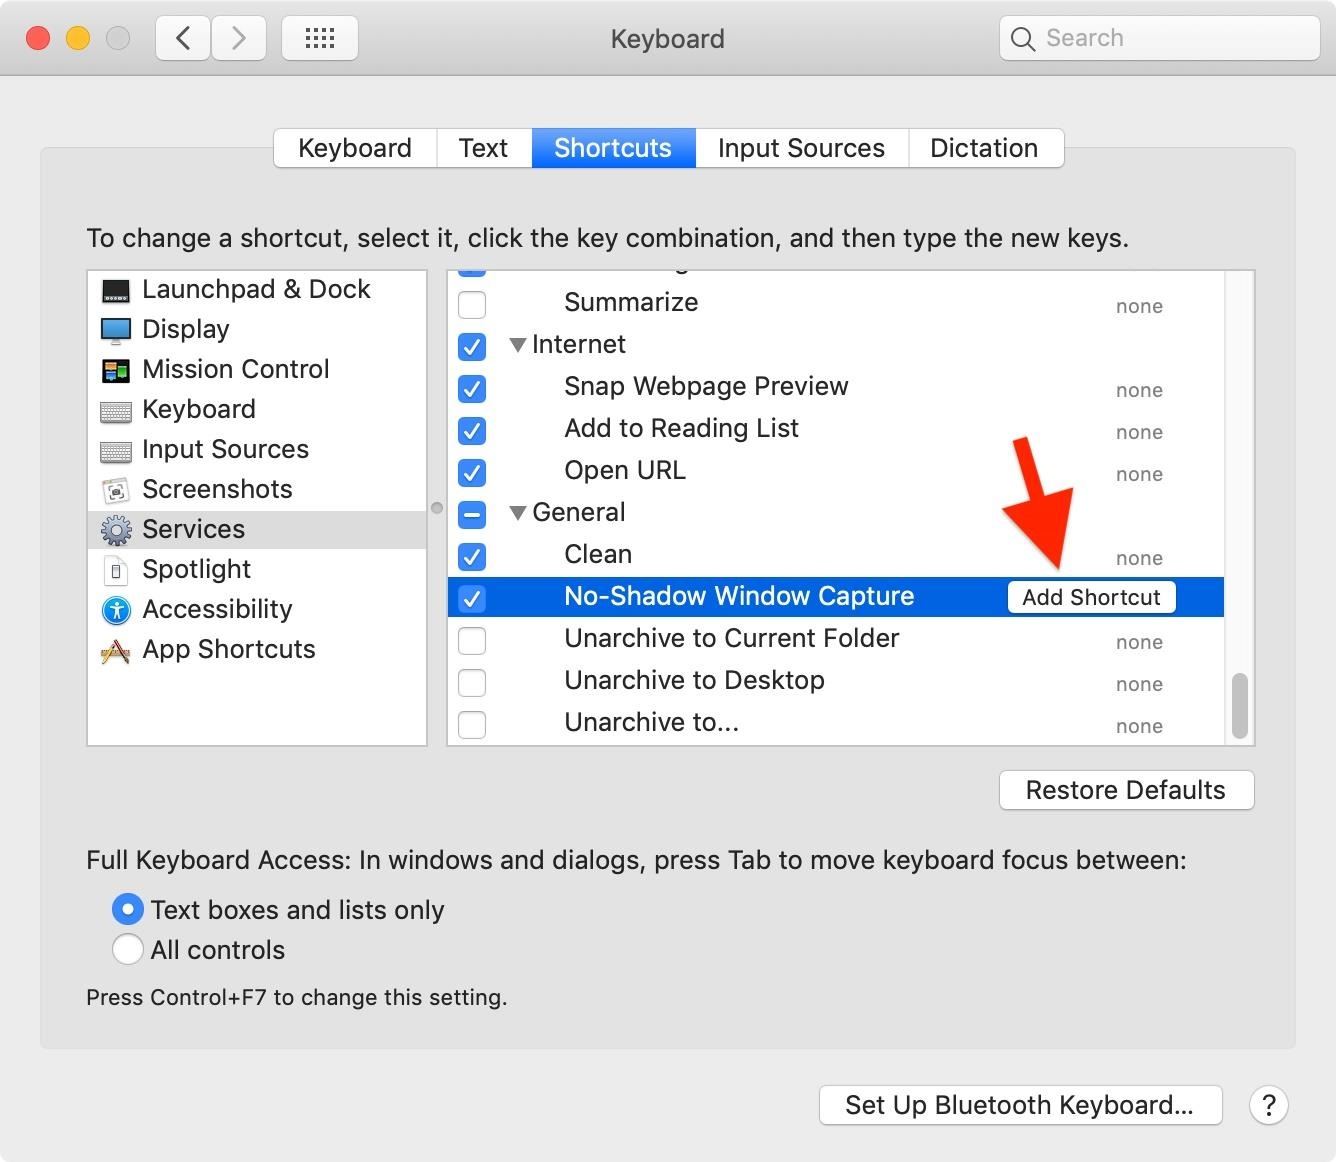
Make a Keyboard Shortcut for Faster CapturingTo streamline this process, add a keyboard shortcut for the service so that you don't have to do any more clicking than needed. To do this, go to System Preferences –> Keyboard –> Shortcuts, select "Services" from the left sidebar, then scroll down in the right column to "Window Capture" (or whatever you named it) under the General section. Click on "Add Shortcut" to the right, then input one using your keyboard. I chose Command Shift 6 so that it's close to the default screenshot shortcuts — without having to worry about Spacebars or Option keys.Command Shift 3 = full-screen picture Command Shift 4 = selected area picture Command Shift 5 = Mojave's new Screenshot app Command Shift 6 = isolated no-shadow window picture
Caveats of Using the Window Capture ToolWhile this new Window Capture tool will get the job done in most cases and is more convenient than other methods, there is one minor caveat to using it — it doesn't play nice with app preference windows.As an example, let's take iTunes. If you open up "Preferences" in iTunes, you won't be able to use the keyboard shortcut to take a screenshot of the Preferences window. You won't be able to use File –> Services in the menu bar either.To take a screenshot of something that won't register with your custom capture tool, fall back on one of the other methods in this article to get the job done. It's much easier than working around this limitation. For instance, use the default Command Shift 4, Spacebar, Option-click routine, the TinkerTool method, or the Terminal trick. They're not as bothersome when you only have to do it sometimes.Also, if you want to take a screenshot of a window that also just happens to have another window open within it, like a drop-down box, it most likely won't capture both. So, take a drop-shadow-less screenshot of the main window, then a screenshot with a drop shadow on the inner window, then add the inner one to the big one in Photoshop or another photo editing program.
Deleting Your New Window Capture ServiceIf you don't like this new Window Capture shortcut, you can always disable it by unchecking it from the "Services" menu in the keyboard shortcuts menu, mentioned above. Additionally, you can delete it altogether. All services that you create using Automator are located in the "Services" folder, which can be found by going to Username –> Library –> Services. Just find "Window Capture" (or whatever you named it) and trash it.Follow Gadget Hacks on Pinterest, Twitter, YouTube, and Flipboard Sign up for Gadget Hacks' daily newsletter or weekly Android and iOS updates Follow WonderHowTo on Facebook, Twitter, Pinterest, and Flipboard
Cover image, screenshots, and GIF by Justin Meyers/Gadget Hacks
If you have a Mac, you've probably noticed that every time you take a screenshot of an opened window, it will add a nice drop shadow to this screenshot. While it does give the screenshot a little more character, sometimes, you just don't want to have this shadow effect in your screenshot.
That options to take app window screenshots are really useful, as they let you select a full window without your desktop or any additional app windows behind it cluttering things up — but it still adds a drop shadow to the selected window, as seen below.
Capture Screenshots Without Drop Shadows on Your Mac
Mac OSX. Taking screenshots of a window on OSX works right out of the box. You just press cmd ⌘ + 4 and then press space to select the current window and then press your touch pad to take the photo. And you will get a nice screenshot with a drop shadow. Done! Windows. When it comes to take screenshots of let's say a Powershell terminal for
screen capture - How do I take a screenshot without the
The complete steps to taking a screenshot of a window in macOS without a drop shadow are: Open the window you of which you want to take a screenshot. Press Command+Shift+4 on your keyboard (or Command+Shift+Control+4 if you want to save it to the clipboard). Press space bar. The cursor will change from a crosshairs to a camera icon.
How to take screenshot on Mac without drop shadows
How to Take Window Screenshots Without Drop Shadows on Your Mac
How to take a Mac screenshot without the shadow effect 1) Press the Command (⌘)-Shift (⇧)-4 keys simultaneously on your Mac's keyboard. You'll enter a mode where you can take a screenshot of a selected area of your screen and your mouse pointer should change to a crosshair icon.
How do I take a screenshot of a window in macOS without a shadow?
If I take a screenshot with Shift ⇧ + Command ⌘ + 4 + Space, then I get one of the two images:. Either way the saved image is surrounded by the shadow halo. I could then edit it out by hand (using Preview) to discard the shadow, or I could use Shift ⇧ + Command ⌘ + 4 and try to pinpoint the boundary by hand, but neither lets me get a pixel-perfect boundary easily.
How to remove the shadow effect from screenshots on Mac
1. Using the Option key. This is the easiest way to capture a screenshot without drop shadows on a Mac. What you need to do is open the window that you want to be captured, press "Command + Shift + 4" and then Spacebar, hold down Option key on your keyboard and then click the window you want to capture.
How to take a screenshot without the shadow effect on Mac
Here at Macgasm, we need to take screenshots of Mac apps all the time. Whenever you take a window screenshot on the Mac (command-shift-4, followed by the spacebar), it captures the window contents and the drop shadow beneath the window, and saves it into a transparent PNG file on your desktop. This
How to take Windows screenshots with drop shadow
This one of the easiest way to capture the screenshot on Mac without drop shadows, Initially you have to open the window you want to capture and press the command + shift + 4 and then space bar, hold down option key on your keyboard and then click the window you want to capture. Using TinkerTool application :
How to Take a Screen Shot Without the Shadow in Mac OS X
osxdaily.com/2011/05/26/take-screen-shot-without-shadow-mac/
How to Take a Screen Shot Without the Shadow in Mac OS X May 26, 2011 - 2 Comments Instead of disabling the screen shot shadow completely you can take a one-time screen capture minus the shadow by using either the Grab app or by using the command line screencapture utility .
How to disable the drop-shadow in Mac OS X window screenshots
0 comments:
Post a Comment